Tuesday, November 22, 2011

Monday, November 21, 2011
Disney Villains
Graham & Brown, the UK's leading wallpaper company, collaborates once again with renowned Biba founder Barbara Hulanicki to create a capsule collection of flock wallpaper celebrating the dastardly delights of the dark side of Disney.
Inspired by the Disney classic Sleeping Beauty with a touch of Graham & Brown magic, Hulanicki brings to life the magnificent Maleficent and her cunning feathered sidekick, Diablo. Depicting the most powerful and sinister characters of all Disney Villains, the new wallpaper collection is deliciously wicked, perfect for a Halloween makeover.
This limited edition collection is exclusively available only for Europe as sold online from Graham & Brown UK site.


About Barbara
Born in Poland , but raised in England, Barbara Hulanicki began her career in Fashion in the early 1960′s working as a freelance fashion illustrator covering all the important fashion collections for the major publications of the day, including Women’s Wear Daily, British Vogue, the Times, the Observer and the Sunday Times. In 1964 she founded, with her late husband, Stephen Fitz-Simon, the famous boutique BIBA. Since then, her bio does not stop filling with new pages from the wealth of activity in the area of design.

THE KNITTED SCULPTURES OF SANDRA BACKLUND


* 1) Photo : Kristian Loveborg
2) Photo: Peter Gehrke
Sunday, November 20, 2011
Athens Museum of Modern Arts


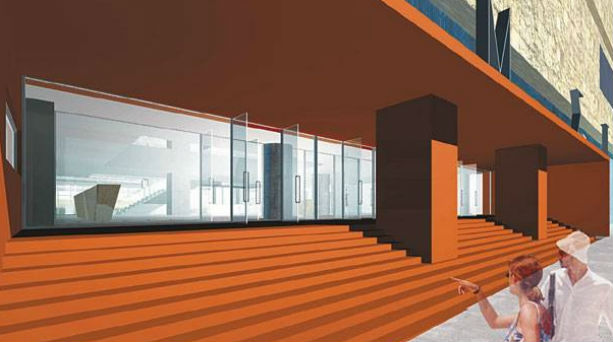


Contractor is ultimately the construction company Aktor, that brought out and construction of the new Acropolis Museum. The architectural design of the new museum made by 3SK Stilianidis.
The modern art museum founded in 1997 but started its operation in 2000 with the founding Director Mrs. Anna Kafetsi. The foundation came to fill a huge gap left by decades of a similar institution for contemporary Greek and international art in Athens.
As a permanent home of the museum selected the abandoned for decades malting Fix at Syngrou avenue.
The EMST immediately began intense exhibition activity. From 2000 to 2003 housed in the basement of the Fix factory, and since 2003 has presented exhibitions in many different places in Athens such as the Athens Concert Hall and the School of Fine Arts.
From September 30, 2008 temporarily established in the building of the Athens Conservatory until completion of the reconstruction of the former building FIX.
The museum's collections, set up from scratch, including an important nucleus of works by Greek and foreign artists such as Ilya and Emilia Kampakof, Yannis Kounellis, Bill Viola, Kostas Tsoklis, Mona Chatoum, Nick Kessanlis, etc., and constantly enriched.
What is the notorious BUILDING FIX?
In 1863 John Fix build the first beer factory in Greece in Kolonaki a neighborhood in central Athens. After his death his son Charles Fix, expanding his business, makes the 1893 a new and great for the era factory in the same place where now stands the existing building on the west bank of Ilissos and south, a short distance, pillar of the Olympian Zeus. At that time the region was unstructured. The neighborhoods south of the Acropolis, which includes this area began to grow after 1900 to 1910.
The success of the firm of Charles Fix during the first decades of the 20th century resulted in the continued expansion of the plant by 1920 in any one position.
By the mid 1950's, the residential fabric of the city gradually spread and covered the area around the factory. However the area still retains low densities with two-storey houses, just before the mass of the system of compensation, which decades has changed completely the character of the area.
In the mid 1950's era industrial reconstruction, decided to major renovation - restoration works and the planning of this project entrusted by the family Fix to the architect Takis Zenetos (1926-1977), the leading representative of postwar modernism in Greece. The design of Zenetos emphasized the horizontal dimension of Fix building along the Avenue Sygrou and Avenue Kallirois glazed with horizontal lines. Furthermore, it sought merely to house an industrial unit but within the overall philosophy interested in the future operation of the building under different conditions in subsequent seasons.
In late 1970, the Brewery moved out of Athens and the whole building, but then in excellent condition, was evacuated.
Over the years became obvious signs of neglect and deterioration of aesthetics, by posting billboards in facades and visible damage to the inner and outer shell of the building.
Friday, November 18, 2011
Vintage Is The Trend


Hel Looks


www.hel-looks.com
Thursday, November 17, 2011
Colorful Macarons


• 2 egg whites
• 150 g icing sugar
• 80 g ground almonds
• 1 tablespoon caster sugar
• ½ teaspoon lemon juice
• 10 drops food colouring (optional)
• 70 g jam sugar
• 100 g Fruit coulis (fruit purée)
• 1 pinch salt
1)Sieve 80 g ground almonds into a bowl, and discard any bits of almonds or skin which remain in the sieve.
You can use "white" ground almonds (without skin) or "grey" (with skin), it's a question of taste and appearence of the finished macarons. In my opinion, "grey" almond macarons have more flavour, but less clear colour (natural, green, yellow, pink, etc...).
2) Sieve 150 g icing sugar into the same bowl.
These siftings (and that which follows) are to obtain a fine mixture of ground almonds and icing sugar, without any small lumps.
3) Then mix almonds and icing sugar with a whisk, to avoid lumps reforming.
4) Put 2 egg whites, a few drops of lemon juice and a pinch of salt in a mixer bowl.
Note: If you have several egg-whites in a bowl, and don't know how many, remember that one white egg is about 35 g.
Beat on high speed until stiff adding the tablespoon of sugar halfway through.
5) Add the 6 drops of colouring, and beat a few seconds more to mix thoroughly.
6) We do this, instead of adding colouring before beating, to keep the colour stronger.
7) Sieve the icing sugar and almonds mixture onto the egg-whites.
8) Tip the bowl slightly and, with a maryse or a spatula (a maryse is much better), mix gently, turning over from top to bottom rather than round.
9) This is the first tricky stage: you should work the mixture, the aim is not to obtain a light mixture (as for a mousse for example)...
10) ...but something slighly runny and shiny.
This process is called "macaroner" in French(to macaron, perhaps?).
11) With a forcing bag (or a teaspoon, but it's much more difficult), form small heaps of mixture on cooking parchment or silicon paper on a baking sheet about the size of a 2 euro coin (1").
Leave a reasonable space between heaps, because they will spread out a little.
12) Tap the baking sheet gently on the work surface to spread out the heaps, and to round them (to remove the small point left by raising the forcing bag).
13) See the photos for what happens after tapping the baking sheet.
14) Leave at room temperature for 30 minutes to one hour, for the heaps to "form a crust".
This is the 2nd tricky stage: this time of "forming crust" is important for macarons which are well rounded, and do not split during cooking.
15) To test if your macarons are sufficiently "crusted", touch a top lightly with your finger: if the dough does not stick to your finger, the macarons are ready.
16) Then preheat the oven to 160°C or 320°F, and cook for 12 to 15 minutes.
For some mysterious reason I have found that macarons rise best if they are on two baking sheets (one on top of the other) instead of a single one.
Turn the baking sheets (front to back) after 6 minutes for even cooking.
17) Leave to cool completely before removing the macarons, and place on a wire rack to await filling.
This is the 3rd tricky stage: You should not overcook the macarons, which should stay moist in the middle. Watch the coloration: if you have used food colouring, they should stay that colour and not become brown.
18) Pair-up the macarons, i.e. by putting together a "top" and a "bottom" of about the same diameter.
Then place "top" and "bottom" beside each other.
THE FILLING
Pair-up the macarons, i.e. by putting together a "top" and a "bottom" of about the same diameter.
Then place "top" and "bottom" beside each other.
Bring to the boil on high heat, and boil for 3 minutes, stirring continuously.
Leave to cool, and begin the assembly when the filling starts to thicken.
Spread a teaspoonful of filling on "bottoms".
Then place a "top" on each one, and press together lightly so that filling is squeezed just a little beyond the edge.
The macarons are ready. Keep in the refrigerator.
TIPS:
For more precise calculations, according to the number of egg-whites you have: please note that for 1 egg white (35 g) you should use 75 g icing sugar and 40 g ground almonds. Allow me to insist on using precise measures for the ingredients in this recipe. I suggest you really weigh everything rather than using volumes, even if you are unused to doing this.
Macarons are always better (smoother) after a night sealed in a box in the fridge.
This recipe can be varied ad infinitum with different fillings and/or colours. For fruit for example, following the basic principles of the recipe you can try: apricot, lime, blackcurrant (mmm!), strawberry, etc... On this page you will find some ideas. I have noticed that to get the full "macaron effect", you need to serve several colours and flavours at the same time. Your guests (and you) will be delighted.
I think nevertheless that macarons are improved when their filling is a little tangy, fruity, to contrast strongly with their very sweet taste.
If you encounter problems, here are some mistakes which all beginners make (and me most of all):
• Not sieving ground almonds and icing sugar => macarons with blisters, lumps of almonds or sugar.
• Poor mixing of egg-whites and dry ingredients => uneven macarons, almond cakes rather than macarons
• Not waiting the 30 minutes to "form crust" => macarons cracked, insufficiently risen or rounded
• Undercooking => macarons too soft, impossible to remove from baking sheet
• Overcooking => dry macarons
• Trying to remove macarons from baking sheet before completely cooled => macarons break up or split in two
• My macarons are brown despite my green (or other) food colouring => overcooking
Thank cooking-ez.com for the lovely recipe
Subscribe to:
Posts (Atom)